ساخت جدول با المنتور در وردپرس

آموزش ساخت جدول با المنتور در وردپرس
آیا میخواهید اطلاعات خود را به صورت منظم و جذاب در وبسایتتان نمایش دهید؟ جدولها بهترین ابزار برای این کار هستند. با استفاده از المنتور، ساخت جدولهای زیبا و تعاملی به سادگی امکانپذیر است. در این مقاله، به صورت گام به گام به شما آموزش میدهیم که چگونه با استفاده از ویجت جدول المنتور و افزونههای جانبی، جداول حرفهای ایجاد کنید.
مقدمه
جداول ابزاری ضروری برای ارائه دادهها به صورت منظم و خوانا هستند. در وردپرس، میتوان از دو روش برای ایجاد جدول استفاده کرد: استفاده از ویرایشگر بلوک وردپرس و استفاده از افزونه. در این مقاله، نحوهی ساخت جدول با المنتور را به شما آموزش میدهیم.
روش اول: استفاده از ویجت جدول المنتور
روش اول: استفاده از ویجت جدول المنتور
- ایجاد یک بخش جدید: در صفحه یا پست مورد نظر، یک بخش جدید ایجاد کنید.
- اضافه کردن ویجت جدول: از بخش ویجتها، ویجت جدول را به بخش اضافه کنید.
- تنظیمات اولیه: تعداد سطرها و ستونها را مشخص کنید.
- تنظیمات ظاهری: رنگ پسزمینه، حاشیه، فونت و سایر تنظیمات ظاهری جدول را به دلخواه تغییر دهید.
- وارد کردن دادهها: دادههای خود را به صورت دستی در سلولهای جدول وارد کنید.
- ذخیره تغییرات: تغییرات خود را ذخیره کنید.
مثال عملی: ایجاد یک جدول مقایسهای برای محصولات
فرض کنید میخواهید یک جدول مقایسهای برای سه محصول مختلف ایجاد کنید. میتوانید ستونهایی برای نام محصول، قیمت، ویژگیها و امتیاز محصول در نظر بگیرید. با استفاده از ویجت جدول المنتور به راحتی میتوانید این جدول را طراحی کنید و آن را در صفحه محصولات خود قرار دهید.
همچنین شما میتوانید با گذراندن دوره آموزش طراحی سایت با وردپرس آموزشگاه پارسه به صورت صفر تا صد طراحی سایت را فرابگیرید برای کسب اطلاعات بیشتر میتوانید از طریق چت آنلاین سایت و تماس مسقیم با مشاورین اطلاعات لازم را دریافت کنید.
برای ساخت جدول با المنتور، مراحل زیر را دنبال کنید:
- صفحه یا پستی را که میخواهید جدول را در آن قرار دهید باز کنید.
- روی دکمهی Edit with Elementor کلیک کنید.
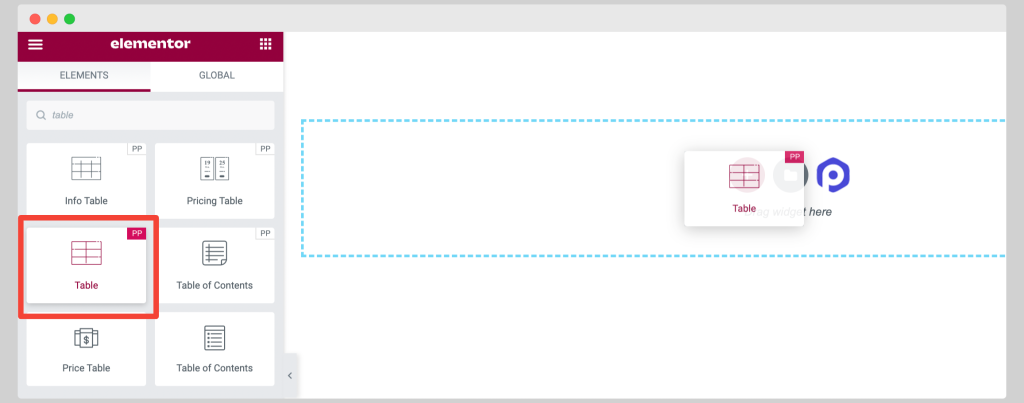
- در منوی سمت چپ، روی Widgets کلیک کنید.
- عبارت Table را جستجو کنید.
- ویجت Table را به صفحه یا پست خود اضافه کنید.
- تنظیمات جدول را مطابق با نیاز خود تغییر دهید.
- محتوای جدول را وارد کنید.
- روی دکمهی Save کلیک کنید.
تنظیمات ویجت جدول
ویجت جدول المنتور دارای تنظیمات زیر است:
- Rows: تعداد سطرهای جدول
- Columns: تعداد ستونهای جدول
- Border: سبک حاشیه جدول
- Padding: مقدار فاصله بین محتوای سلولها
- Background: رنگ پسزمینه جدول
- Text: رنگ متن جدول
- Font: فونت متن جدول
مثال
برای مثال، میخواهیم یک جدول با 3 ردیف و 2 ستون ایجاد کنیم. همچنین، میخواهیم حاشیه جدول از نوع solid و با عرض 1px باشد. رنگ پسزمینه جدول را سفید و رنگ متن جدول را سیاه انتخاب میکنیم. فونت متن جدول را Arial با اندازه 16px میگذاریم.
برای انجام این کار، مراحل زیر را دنبال میکنیم:
- در تنظیمات ویجت Table، مقدار Rows را برابر 3 و مقدار Columns را برابر 2 قرار میدهیم.
- در بخش Border، گزینهی solid را انتخاب میکنیم و مقدار Width را برابر 1px میگذاریم.
- در بخش Background، رنگ white را انتخاب میکنیم.
- در بخش Text، رنگ black را انتخاب میکنیم.
- در بخش Font، فونت Arial را انتخاب میکنیم و اندازهی 16px را میگذاریم.
پس از انجام این تنظیمات، جدول مورد نظر ما ایجاد میشود.
در دوره آموزش طراحی سایت با وردپرس شما میتوانید به صورت کامل ساخت جدول با المنتور را آموزش ببنید.
روش دوم: استفاده از افزونههای جدول
افزونههای جدول وردپرس، امکانات بیشتری را برای ایجاد جدول در اختیار شما قرار میدهند. برخی از این امکانات عبارتند از:
- قابلیت مرتبسازی و فیلتر کردن دادههای جدول
- قابلیت افزودن فرمتهای مختلف به دادههای جدول
- قابلیت ایجاد جداول تعاملی
در ادامه، به معرفی یکی از بهترین افزونههای جدول وردپرس، یعنی TablePress میپردازیم.
افزونه TablePress: ساخت جدول حرفهای در وردپرس
مقدمه
جداول ابزاری ضروری برای ارائه دادهها به صورت منظم و خوانا هستند. در وردپرس، میتوان از دو روش برای ایجاد جدول استفاده کرد: استفاده از ویرایشگر بلوک وردپرس و استفاده از افزونه.

استفاده از افزونههای جانبی
برای افزایش امکانات جدولهای المنتور، میتوانید از افزونههای جانبی مانند TablePress استفاده کنید. این افزونه به شما امکان میدهد:
- جداول را از فایلهای CSV یا Excel وارد کنید.
- دادههای جدول را مرتبسازی، فیلتر و جستجو کنید.
- جدولهای تعاملی ایجاد کنید.
- و بسیاری از امکانات دیگر
افزونه TablePress یک افزونه رایگان و پرکاربرد برای ایجاد جدول در وردپرس است. این افزونه دارای امکانات زیر است:
- قابلیت ایجاد انواع مختلف جدول، از جمله جدولهای ساده، جدولهای مرتبسازیپذیر، جدولهای فیلترپذیر، جدولهای تعاملی، و …
- قابلیت افزودن فرمتهای مختلف به دادههای جدول، از جمله فرمتهای تاریخ، زمان، عدد، متن، و …
- قابلیت صادرات و واردات دادههای جدول
در این مقاله، به معرفی افزونه TablePress و نحوهی استفاده از آن میپردازیم.
نصب افزونه
برای نصب افزونه TablePress، مراحل زیر را دنبال کنید:
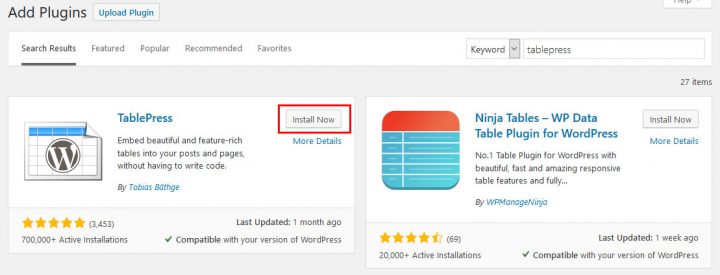
- از طریق منوی افزونهها > افزودن، عبارت TablePress را جستجو کنید.
- روی دکمهی نصب کلیک کنید.
- پس از نصب، افزونه فعال میشود.
ایجاد جدول
برای ایجاد جدول با افزونه TablePress، مراحل زیر را دنبال کنید:
- در صفحهی اصلی وردپرس، روی افزونهها > TablePress کلیک کنید.
- روی دکمهی افزودن جدید کلیک کنید.
- نام و توضیحات جدول را وارد کنید.
- تعداد ستونها و ردیفهای جدول را مشخص کنید.
- تنظیمات دیگر جدول را طبق نیاز خود تغییر دهید.
- روی دکمهی ذخیره کلیک کنید.
ویرایش جدول
برای ویرایش جدول، مراحل زیر را دنبال کنید:
- در صفحهی اصلی وردپرس، روی افزونهها > TablePress کلیک کنید.
- جدول مورد نظر خود را انتخاب کنید.
- روی دکمهی ویرایش کلیک کنید.
- تغییرات مورد نظر خود را در جدول ایجاد کنید.
- روی دکمهی ذخیره کلیک کنید.
حذف جدول
برای حذف جدول، مراحل زیر را دنبال کنید:
- در صفحهی اصلی وردپرس، روی افزونهها > TablePress کلیک کنید.
- جدول مورد نظر خود را انتخاب کنید.
- روی دکمهی حذف کلیک کنید.
- روی دکمهی حذف در پنجرهی باز شده کلیک کنید.
مزایای استفاده از افزونه TablePress
افزونه TablePress مزایای زیر را دارد:
- رایگان و متنباز است.
- دارای امکانات و قابلیتهای فراوانی است.
- استفاده از آن آسان است.
- بهروزرسانیهای منظم دریافت میکند.
جهت دانلود افزونه TablePress از مخزن وردپرس کلیک کنید.
در دوره آموزش طراحی سایت با وردپرس و دوره آموزش وردپرس پلاس میتوانید کار با افزونه TablePress را به صورت کاملا حرفه ای آموزش ببنید.
جهت اطلاعات بیشتر در خصوص دوره های آموزشی آموزشگاه پارسه میتوانید با مشاورین مجموعه ارتباط برقرار کرده تا به صورت رایگان در خصوص دوره ها شما را راهنمایی کنند .
نتیجهگیری
در این مقاله، نحوهی ساخت جدول با المنتور و افزونههای جدول وردپرس را به شما آموزش دادیم. با استفاده از این روشها، میتوانید به راحتی و با کمترین دانش فنی، جدولهای مورد نیاز خود را در وردپرس ایجاد کنید.
چرا از المنتور برای ساخت جدول استفاده کنیم؟
- سادگی استفاده: با رابط کاربری گرافیکی المنتور، بدون نیاز به دانش کدنویسی میتوانید جدولهای دلخواه خود را بسازید.
- انعطافپذیری بالا: میتوانید ظاهر و ساختار جدول را به دلخواه خود تغییر دهید و آن را با طراحی وبسایتتان هماهنگ کنید.
- امکانات گسترده: با استفاده از افزونههای جانبی، میتوانید امکانات بیشتری مانند مرتبسازی، جستجو و فیلتر کردن دادهها را به جدول خود اضافه کنید.
مطالب زیر را حتما مطالعه کنید

وظایف ادمین اینستاگرام چیست؟
در این مقاله، قصد داریم پرده از راز و رمزهای کار یک ادمین اینستاگرام برداریم. از تعریف دقیق این نقش گرفته تا جزئیات هر یک از وظایف کلیدی، با ما همراه باشید تا دنیای پر رمز و راز مدیریت یک پیج اینستاگرام را کشف کنیم.

درآمد و بازار کار طراحی سایت در ایران

آموزش راهاندازی کسبوکار در اینستاگرام
آموزش راهاندازی کسبوکار در اینستاگرام به شما کمک میکند تا بتوانید با استفاده از این پلتفرم محبوب اجتماعی، کسبوکارتان را بهطور حرفهای شروع و مدیریت کنید. این آموزش شامل نکات کلیدی برای ایجاد محتوای جذاب، افزایش دنبالکنندگان و تبدیل آنها به مشتریان واقعی است.
محتوای پرطرفدار در یوتیوب :چه نوع محتوایی در یوتیوب بیشتر دیده میشود؟
آموزش کامل فعالسازی کسب درآمد از یوتیوب

دیدگاهتان را بنویسید